Monday, December 31, 2012

I did survive...


...the 2012 edition of the Fields Family Frolic, an annual holiday get-together for any of the family that can make it.  This year, the three sisters and their entire families were able to make it... just my brother and his family were unable to attend.

Sign on the front door!

In addition to lots of visiting/catching up on all the news and lots of delicious food, we had the annual games.... both board games and activity games for young and old!


Game Master/Uncle Monty started us off with the M&M game, where one had to use a straw to pick up an M&M and place it on the top of another straw.  This was the championship round...  nephew Drew won with grandson George close behind.
 

Next up was building towers from folded index cards.  Grands (my grandchildren) were assisted by Cousins (my nieces and nephews)... and the following round was my kids and the three sisters.   No one with an engineering degree was allowed to participate!   *lol*


Another popular game was "place an Oreo cookie on your forehead and then get it to your mouth without using your hands"...  there would have been more than one round but someones got into the Oreos prior to the game so there were only enough cookies for one round!    *lol*


The marshmallow catapult game was  exciting... you can see me ducking my head after I dropped the PVC pipe onto the paper plate holding a couple of marshmallows, which came flying at me... but went over my head.  The object of the game was for the kids to see who could catch the most marshmallows.


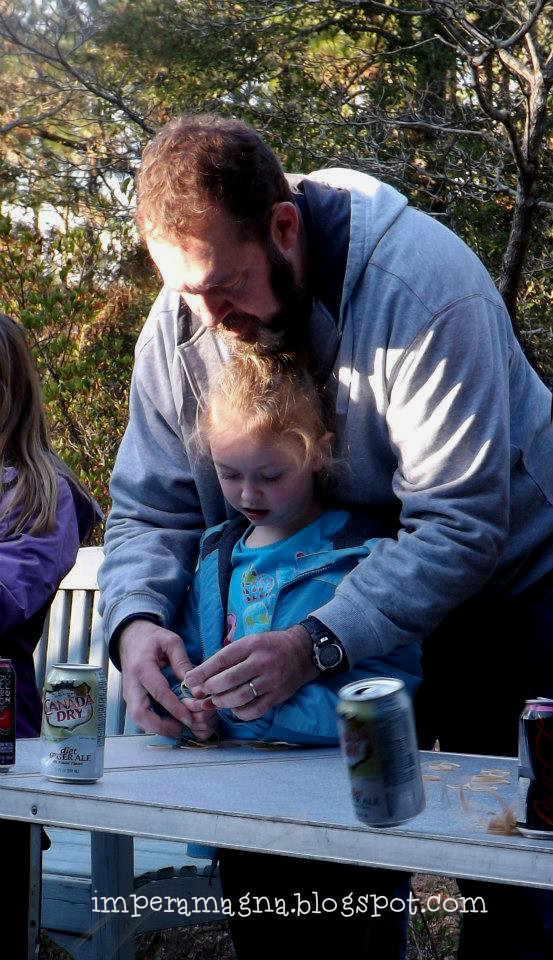
New skills needed to be learned by the younger participants...  such as "how to shoot a rubber band at an empty soda can/bottle"...


...and fun was had by all!   And we have photos to blackmail folks...   uh... prove we all had fun too!    Let's not forget the "drop the Mentos (candy) in the bottle of diet Coke" game...


It was too windy for the balloon game but the kids had fun with them anyway.


I enjoyed the "fan the plastic Christmas ornament with a piece of cardboard and move it to the square taped on the road" game... no photos because the photographer was participating in the game!


Many thanks for an enjoyable afternoon go to Game Master/Uncle Monty!!!   Discussions are already underway for next year's frolic... who knows what will we'll be up to?


Tuesday, December 25, 2012

Monday, December 24, 2012

'Twas the Night before Christmas....


....okay, it's the morning of the night before Christmas!  The house is decorated, all the presents are wrapped, and cooking will soon commence shortly!   

I wanted to share a little trick I learned on Pinterest... you know those long rolls of wrapping paper?   Aren't they "fun" to store til next year?   Hate how tape and rubber bands mess up some of the paper?  And if you don't try to keep the rolls from unrolling...  you've got a mess!


Well...  take the cardboard tube from an empty roll of toilet paper, cut it length-wise, and slip it over the wrapping paper tube.  Et voila!  You have a handy-dandy clamp for your wrapping paper!   I didn't think it would work but it did!   And it's FREE!   What more can a girl ask?

Oh yes...  a little eye candy!


Hey!   I may be old but I'm not blind!    *lol*    I'd be happy if Santa brought either and/or both....   

Posted this video last year but it's a favorite...


Wishing you a lovely Christmas Eve...


 ...and last but not least...


Saturday, December 22, 2012

One last project....


...however, it's not a Christmas present!   Just another quilt in my "Everyone in the Family is Going to Have a Quilt if it Kills Me!" project.... this one for a nephew who will be here with his family for New Years.


After sewing the back together, I have the quilt sandwich ready to pin...


....my project for this evening!   Quilting will begin tomorrow.


No, this is not my house...  it just looks Christmas-y...'
not that it ever snows here at Christmas... so I guess you could say...
I'm dreaming of a...


Thursday, December 20, 2012

Photo Album

I started back to work on Monday and have been playing catch up.... so, not much sewing has been happening.   I did received some photos in emails from my daughter and daughter-in-law and thought I'd share.

Remember the gold robot costume?   Here's my boy...


My daughter has an open house this evening and here is the table in the kitchen with the table topper I made her...


My granddaughter Emma helped her mom make pigs in the blanket...


...and Chloe's made-at-school "gingerbread house" is part of the decoration on the dining room table.


Bless the teacher who had her entire first grade class making these!   I sure hope there were lots of parents on hand to help....


Sunday, December 16, 2012

Crinkly Goodness


I was able to sew down the binding on my brother's birthday quilt yesterday and run it thru the washer/dryer.


Gotta love a soft, crinkly quilt straight from the dryer!


I tried a new way (for me) of sewing down the binding.  After attaching the binding to the back of the quilt, I folded it to the front and sewed it down using my machine.


I thought it made for a much nicer finish than sewing it to the front, folding to the back, and then stitching in the ditch on the top (so the stitches are hidden).


Now, I don't have a problem with hand stitching down binding...  I'm near-sighted and can still thread a needle without glasses!   I also find hand sewing/embroidery relaxing and have spent many an evening in front of the television, stitching away.   However, I find that hand sewing things is similar to pie crusts for most folks... at least the ones I hang out with...


 ...they don't value hand sewing, don't know the difference (or even notice), and don't particularly care one way or the other if something is hand sewn or machine sewn. So....  why spend the time?  That is, unless the recipient does know the different and appreciates hand sewing...  


My gifted quilts are made to be used and enjoyed... not entered in a quilt show to be judged.  Additionally, after battling perfectionism for most of my life....  I don't want that ugly monster rearing its head again!    


After all, my goal in life is to be happy....


Saturday, December 15, 2012

Friday, December 14, 2012

Birthday Quilt


My brother will turn 60 on December 29th and I wanted to make a quilt to commemorate the occasion.  Fortunately, I had the top and backing assembled earlier this fall.   I finished the quilting yesterday using the wavy line "pattern" that I love on jelly roll quilts.


I used a wider spacing for the lines and like how it turned out.  Hopefully, it will be a fluffier quilt when it comes out of the dryer.

(The backing isn't gray or gray-green but a gray-tan, 
more like the little spacers on the top.)

My goal for today is to get the binding on and run the quilt through the wash.


Thursday, December 13, 2012

Sleigh Ride


Since the grandkids were little, I gave them each a tiny mesh bag of "chocolate money" to carry on a tradition my grandmother started when I was a little girl.  Evidently, the kids have loved getting chocolate money so much that now their parents are including it in their stockings at home.   When they get to my house, it's: "Oh... more chocolate money."   I had to come up with something else... and thanks to Pinterest, I did!

 This "recipe" called for candy canes, and various sized candy bars.  (Because of a peanut-allergy, I had to eliminate any candy with nuts of any type from the selection.)  You'll also need a hot glue gun, perhaps some double-sided tape, and some ribbon.


Run a line of glue along the inside of each candy cane and attach to the bottom of the KitKat bar.  I propped the KitKats on top of the other candy selected to make it easier to attach the candy canes and give them time to cool.


I played with the little candy bars to see how best to stack them and arrived at this arrangement.  


I decided not to use the double-sided tape since these won't be going anywhere (like a cookie exchange) and thought the ribbon would be sufficient to hold the candy on the "sled."


The original idea (as found on Pinterest) was from Just Say Sew in a post about a cookie exchange.

Photo borrowed from Just Say Sew!

I also thought this would be a neat way to give a teen a cash or a check by including it in a small envelope attached to the candy sled.


Ho ho ho!


Wednesday, December 12, 2012

A Cup of Cocoa?


I'm sure by now most of us have been sucked in by Pinterest...  I am grateful for Pinterest because during the days and weeks post-fall, when I wasn't up to much but trying to endure until time for the next dose of meds... scrolling through the pins kept me occupied and my mind off my troubles.  I also found a few ideas for Christmas gifts!

One "recipe" I thought was cool started with a mug, several brown FQs and a spool of white thread.


The FQs are rolled up around the spool of thread...


...and inserted in the mug!  Because there was nothing under the spool of thread, it "sunk"... so I removed it and folded down a corner of the inner FQ...


...and reinserted the spool of thread.    Cup of cocoa anyone?


I'm meeting a good friend tonight for dinner and this will be an early Christmas gift for her.


Ho, ho, ho!


Tuesday, December 11, 2012

Quilter's ADHD: Holiday Edition


When I went to the Missouri Star Quilt Company site the other day to get the link to the Christmas throw/quilt tutorial, I noticed they had a new video posted...


Well...   I have Christmas fabric leftovers from the holiday table runner I made for my daughter!  And....  I have a Dresden template...


I tried to resist....  but I couldn't...  


The tutorial was easy to follow (my first Dresden plate) and the pieces went together quickly.


I made the quilt sandwich from the spokes, the batting and the backing and stitched-in-the-ditch to quilt it before adding the center circle.  I loved the part about gathering the round center fabric around the cardboard template!


I used a button-hole stitch around the center circle to sew it down and for sewing down the binding (used bias tape cut from the same holly fabric as the center).


The table topper finished at 23" in diameter due to the 11"-long Dresden template I used (MSQC's specialty template is 10" long). I'm sure it will shrink a little after washing and drying.

Someone....  tell me to stay away from fun quilt-y tutorials!    *lol*